To make sure the outside of your home is in good shape before the cold weather sets in, here are some handy tips on overcoming problems with walls and flat roofs.
Now is a good time to have a look at the walls and flat roofs to see how they are standing up to the elements, so that you can rectify faults before they get any worse – and the problems multiply.

Walls
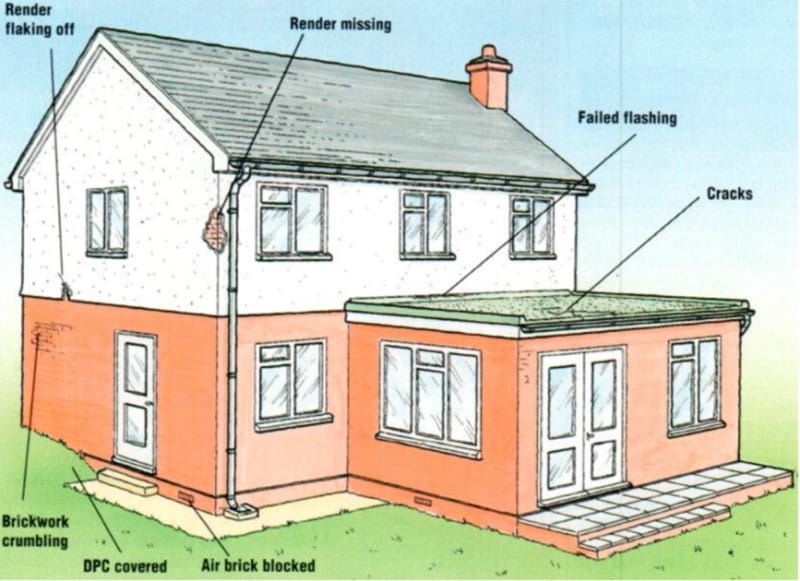
First, have a good look at your walls overall. Are they leaning outward? Look along the wall to check.
Are there major cracks between or across the bricks? Is any of the rendering coming away?
If you find any of these faults, you should call in professional help straight away – a surveyor or a builder, in case you have serious problems on your hands.
Brickwork
Now look at the brickwork more closely. You may find the surface of sane bricks has broken up.
This process is known as spalling, caused by water getting into the brick, freezing and forcing off the outer layer.
It will be easy for a bricklayer to remove one or more single bricks and to replace them (or simply tum them around).
This might even be a job you are prepared to have a go at yourself.
If you have an older house, you should be able to buy matching bricks, second hand, from an architectural salvage yard.
Don’t worry if you find a whitish bloom on the surface of the bricks. This efflorescence is caused by salts in the wall coming to the surface and will go away of its own accord. Remove it with a dry brush and not with water.
Also check the pointing – the mortar courses between the bricks.
Pointing
This does an invaluable job of keeping moisture out of the house (particularly with solid walls), but in time the mortar dries and starts falling out.
If you find that the mortar is starting to do this, it will have to be raked out and fresh mortar put in. This process is known as repointing.
Although this job is not difficult, it is extremely time-consuming and fiddly. If you want to tackle it yourself, see the step-by-step instructions further down this guide.
Airbricks
Now look further the wall at the air bricks. These perform the essential job of ventilating the space underneath suspended timber floors.
The air flow that the air bricks provide prevents rot forming and makes an attack of woodworm less likely.
Air bricks should never be blocked up in the mistaken idea that they save heat. If you find that yours have been blocked, clear them out with a piece of wire.
Cracks & Gaps
Cracks and small missing sections in cement render can be repaired using a mix of one part cement to six parts building sand, or you can buy a suitable dry mix ready made up, to which you just add water.
A small pointing trowel or filling knife can be used to apply this mix. If the render is coming away from the wall in slabs, seek professional advice, and get a builder in if pebble dashing is damaged.
Damp Proof Course
Check the damp-proof course (DPC), a thin line of bituminised felt (or, in older houses, slate) low down on the wall.
This performs the vital job of preventing water rising up through the brickwork. In particular, check that it is not covered by earth, or by a concrete path or patio built alongside the house.
If you think you may have problems connected with rising damp (a tidemark on the walls inside), call in a surveyor or professional damp-coursing firm to check the moisture levels in the wall.
If the damp-proof course has failed, you will need a new (chemical) one to be installed professionally. Depending on the amount of damp in the wall, it may be necessary to strip off the plaster inside and replace it with specially formulated damp-resisting plaster.
Note that many damp patches inside the house may also be caused by condensation (the cure for which is to improve heating, ventilation and insulation), or by penetrating damp (rainwater getting through the wall), the cure for which is to apply a water repellent to the outside of the wall.
Flat Roofs
The flat roofs found on attached garages and extensions can often be a source of problems.
First of all, you should check inside the garage, or the extension, that there are no damp patches. If there are, it means water is getting through, but necessarily immediately over the damp patch.
Go outside and, with a secure ladder, climb up onto the flat roof, taking some boards with you so that you can walk around safely.
The two faults that you are most likely to find are cracks and blisters in the roof covering, and failures at the junction between the roof and the wall.
Cracks and blisters can be dealt with using a roof repair sealant. Blisters should be cut open with a sharp knife so that the sealant can be pushed underneath before being painted on top.
If you are repairing a large area (or of course, the whole roof), the small stones on the roof should be removed first and replaced afterwards (they protect the roof from the direct rays of the sun). A rubberised roofing repair compound can be applied with a brush.
To repair a failed joint where the roof covering meets a vertical wall, self-adhesive flashing is to be used. This has a bitumen facing and an aluminium core and it is simply stuck along the joint after any cracks have been filled and a primer has been applied.
A wallpaper seam roller is a useful implement that will help you to smooth it down in place.
Step By Step Repointing Guide
Maybe just a small area of wall needs repointing, or perhaps the whole wall.
When working more than 6ft off the ground, hire a scaffolding platform tower to work on – do not rely solely on a ladder.
Checklist
| Tools Needed: | |
|---|---|
| Club hammer | Bucket |
| Cold chisel | Wooden board |
| Brush | Pointing trowel |
| Paintbrush | Copper tubing |
| Dry-pack ready-mixed bricklaying or repointing mortar |
Step 1
Use a club hammer and a cold chisel to remove the old, loose, cracked or crumbly mortar to a depth of around 20mm. Sound mortar can be left in place.
The correct chisel is known as a plugging chisel, but an ordinary cold chisel (not a working chisel) will do. Brush away any loose dirt and grit.
Step 2
Dampen the area to be repointed with a paintbrush dipped in water so that there is a good grip between the old mortar and the new.
Mix up a bricklaying mortar. For small areas, buy a pack of dry ready-mix bricklaying or instant mortar, to which you can simply add water.
Step 3
Mix the mortar in a bucket and transfer some to a wooden board.
Holding the board close to the wall, push a small amount of mortar into the joints with a pointing trowel, starting at the highest point.
You will find it easiest if you fill the vertical joints first and then the horizontal ones.
Step 4
Remove the surplus mortar as you go and finish off the joint profile with the appropriate tool.
Here, a bucket handle profile is achieved with a short length of copper plumbing pipe.
When the mortar has set, but is not quite dry, brush lightly over the whole area.
Get Professional Builder Help
If you are in any doubt about the condition of your property and/or do not have the relevant experience to perform these maintenance tasks, we always recommend that you speak to qualified builders.
You can find local builders in our directory or simply post details of what you are looking for and we will help get quotes from local builders near you.


